How to set up a local copy of Opentrack
warning in 2025 - needs updated and shorter instructions for Windows
WARNING - this is only for trusted, skilled developers who already have quite a lot of the basic skills to work with Python and Django. Choose between using Mac OS or Windows 10 Subsystem for Linux (WSL) Setups, only follow the code for the sections that applies to you.
OpenTrack is a large Django application, with MySQL and Mongo databases, and Redis for cacheing. It also acquired many libraries over 10 years or so, so it takes a while to set up.
Git repo and deployment
Code lives in Andy's GitHub account: https://github.com/captainrobbo/opentrack
Developers need their own GitHub account, but usually have one these days, and we can then invite you
You may see references to a dorectory names raceresults - that's the
original project and repository name, because the first thing we did was
a results site for the Surrey Cross Country League before the OpenTrack name was coined.
We generally work on the master branch. Code can be deployed to the live server by pushing to a branch, which Amazon Codebuild is watching.
The actual deployment is done, when all code is committed, with a command
bin/deploy-test
bin/deploy-production
bin/deploy-trans
Mac OS
Getting set up for access
If you can actually see this web page, it means we have added you to the correct permission groups to at least download data. Andy, Ben, Djan or Robin can do this.
To download the most recent MySQL or Mongo database snapshots, you will need a copy of the restricted-use SSH key file otr-download. This should be in your .ssh directory, with 600 permissions.
Prerequisites
Ensure you have MySQL or MariaDB working, and can connect to it locally as the root user with no password (this is what we usually do in development; servers have unique passwords). MySQL will need you to increase the max_allowed_packet variable, as when you load a large database dumped from the server in one SQL file, it might be half a gigabyte!
Create an empty SQL database called otr
(raceresults) MacBook-Pro:raceresults andy$ mysql --user=root
MariaDB [(none)]> create database otr;
Query OK, 1 row affected (0.00 sec)
Andy has these versions:
MacBook-Pro:ot-staff-docs andy$ mysql --version
mysql  Ver 15.1 Distrib 10.1.20-MariaDB, for osx10.11 (x86_64) using readline 5.1

MacBook-Pro:ot-staff-docs andy$ mongo --version
MongoDB shell version v3.4.0
Likewise ensure MongoDB is installed - instructions here.
Get the code and set up virtual environment
cd ~/code
git clone https://github.com/captainrobbo/opentrack
source bin/activate
pip install -r requirements.txt
To install mysqlclient it might be necessary to try:
brew install openssl
LDFLAGS=-L/usr/local/opt/openssl/lib pip install mysqlclient
Copy down the MySQL and Mongo databases
Here is a version of the script Andy uses, a few tweaks may need to be made depending on the user:
if [ "True" != "`python -c "import sys; print(hasattr(sys, 'base_prefix'))"`" ]; then
    echo "ATTENTION!\nYou must use this script whilst inside a virtualenv!\n"
    exit 1
fi
TMP="tmp"
mkdir -p "$TMP"
SQLF="$TMP/otr-latest.sql.gz"
aws s3 cp s3://privatebucket.opentrack.run/recent_live_data/otr.sql.gz "$SQLF"
echo "Downloaded database"
mysql --user=root -e "drop database otr;"
echo "Deleted old database"
mysql --user=root -e "create database otr;"
echo "Recreated empty database, loading"
gzip -dc "$SQLF" | mysql --user=root otr
echo "Copied database"
rm -rf "$TMP"/{otr-mongo-latest.tar.gz,dump}
aws s3 cp s3://privatebucket.opentrack.run/recent_live_data/otr-mongo.tar.gz tmp/otr-mongo-latest.tar.gz
tar xf tmp/otr-mongo-latest.tar.gz
mongo --eval='db=db.getSiblingDB("otr");db.dropDatabase();'
mongorestore -d otr dump/ot-main-prod
echo "copied mongo"
Test and run
python manage.py collectstatic
python manage.py test project
python manage.py runserver
Test suite (takes a few minutes, may give one error relating to copying a competition):
python manage.py test project
Update this document!
If you learned anything new, had to run extra commands, or have tips on versions and distributions to use, please keep detailed notes, and add a section here when done!
Windows/Linux Setup
What are your options for Windows?
You have a two options if you are on Windows (ignore if you are running Linux natively):
- Github Codespaces (recommended for beginners)
- Quickest to setup
- Can access from any machine
- Can be used on low spec machines
- Its currently free
- Windows 10 Subsystem for Linux (WSL)
- More control
- You can take advantage of your high spec machine
Windows 10 Subsystem for Linux (WSL)
Note ignore this section if you are going to use Github Codespaces
This has been tested and successfully setup on Ubuntu 18.04 and 20.04 for Windows WSL. If you haven't already, install Ubuntu from the Microsoft Store and search for Ubuntu. Note that the Windows Subsystem for Linux (WSL) feature must be enabled. To do this, search for 'Turn windows features on or off' in Windows Start and select 'Windows Subsystem for Linux', click OK and reboot. Now a new Linux terminal can be opened by searching 'Ubuntu' into Windows Start. It is also recommend installing Terminal from the Windows store and using VScode as your IDE. Sublime also works.
Github Codespaces
Note ignore this section if you are going to use WSL
Quick intro infomation to read before continuing This link
You will first need access to the Github repo for OpenTrack. Ask Andy to send you an invite and access it from the email. After you should now have access to this url This link. Make sure your logged in because this is a private repo.
Next click the green 'Code' dropdown button and choose the CodeSpaces tab option. Then click the plus
icon to create a new codespace for this repo.
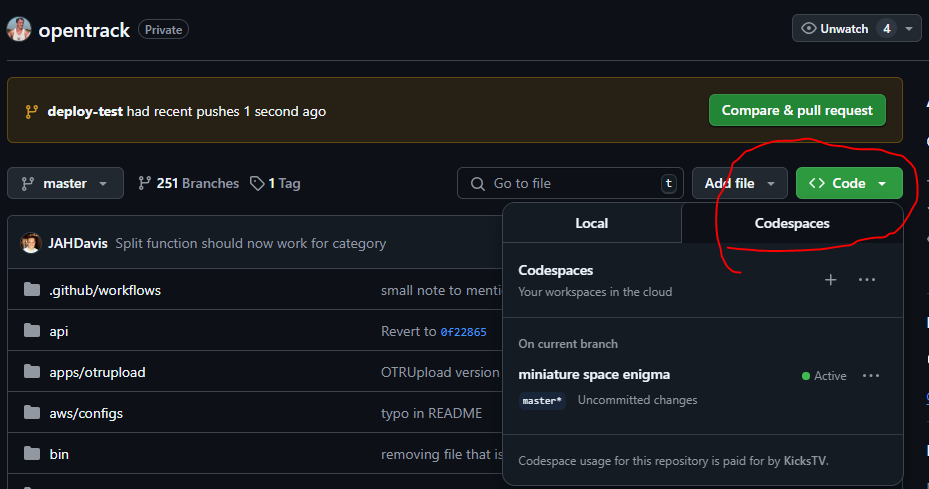
If your familiar with the VS Code IDE then this is just the web version of it. You can also launch it in
desktop mode by clicking on the bottom left which says 'Codespaces: miniature system' and then in the dropdown
click 'Open in VS Code desktop'.
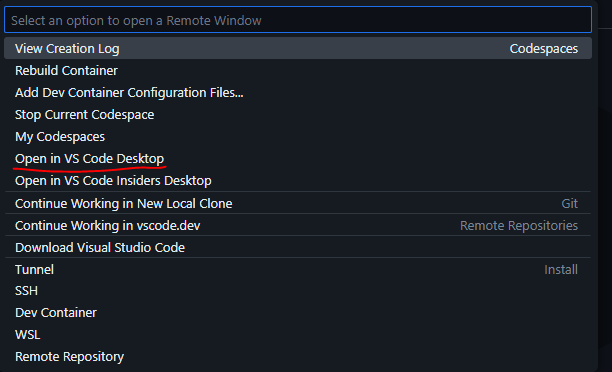
Note that this is a virtual machine and will be shutdown after a certain amount of time being inactive
Non Specific Linux Environment setup
From this point onwards it does not matter which linux setup you have and it should be the same process.
See the next section for installing on Linux with no root access.
After setting up a user:
sudo apt update
Github Setup
Note that you will need to ask for an invite to the Github repo from Andy as it is private.
Repo Link: link
Github CLI install Link: link
Install:
sudo apt install gh
Basic usage:
gh auth login # will open a new tab for github authentication
gh repo clone <repo_url> # github clone command
Python3.9 setup
sudo add-apt-repository ppa:deadsnakes/ppa
sudo apt install python3.9 python3.9-venv python3.9-dev
Then we want to install Pip which will manage all your python packages for the project.
sudo apt install python3-pip
Get the code and set up the virtual environment
This allows us to create virtual environments for individual projects where we can have different versions of the same software.
To create a virtual environment, first cd into the project directory i.e. /opentrack.
cd opentrack
python3.9 -m venv .
To activate, then update the virtual environment:
. bin/activate
python3.9 -m pip install pip --upgrade
Your terminal should now have opentrack in brackets in the start of the line e.g. (opentrack).

To deactivate virtual environment:
deactivate
Installing Project Requirements
A requirements.txt file is included with the project that was cloned. This lists all the packages and versions needed for OpenTrack.
First check version of python is default for this environment:
python --version
If everything was setup correctly, the version should be set as 3.9.xx If this is not the case then multiple python version exist so you must specify which verion each time when running python commands. e.g.
python3.9 -m pip install -r requirements.txt
Install required packages with:
pip install -r requirements.txt
Then make sure you have devtools just in case manually:
pip install devtools
Then lets install some dependencies:
sudo apt-get install libxml2-dev libxslt-dev
Ignore if successfully installed all packages
Note: If you are experiencing errors to do with lev.. then we need to go to 'source.list' file and uncomment some lines:
cd /etc/apt
sudo nano source.list
# uncomment lines starting with 'deb-src'
# ctrl-s and ctrl-x to save and quit editing file

sudo apt update
sudo apt upgrade

# finally
sudo apt-get build-dep python3.9-dev
Once again try:
pip install -r requirements.txt
Setup of MySQL & MongoDB and Downloading Opentrack Databases
Install both MongoDB and MariaDB:
sudo apt install mongodb-server
sudo apt install mariadb-server

# Dependencies
sudo apt install libmysqlclient-dev
sudo apt install libmongoclient-dev

pip install mysqlclient
Note: Won't be able to access mysql database without sudo
Drop and recreate the user with all priveleges. Make sure mysql server is running and open it:
sudo service mysql status
sudo service mysql start
sudo mysql -u root
Then:
DROP USER 'root'@'localhost';
CREATE USER 'root'@'%' IDENTIFIED BY '';
GRANT ALL PRIVILEGES ON *.* TO 'root'@'%' WITH GRANT OPTION;
FLUSH PRIVILEGES;
exit
You will need a copy of the restricted-use SSH key file otr-download (ask the team for it). This should be in your .ssh directory, with 600 permissions. You can set 600 permission with sudo chmod 600 otr-download.
Note: it shouldn't be necessary to use otr-download anymore, as the aws credentials are now in update-dev-environment
Make sure both database servers are running:
sudo service mysql start
sudo service mongodb start
Finally to get the database data run:
./update_dev_environment
Test and run
python manage.py collectstatic
python manage.py test project
python manage.py runserver
For Linux using conda virtual environments (almost no root access required)
More hassle than the methods above, but necessary if you can't run mysql with sudo (also good for learning how mysql works). To get started quickly, the previous section should be your first port of call.
Note that mercurial can also be procured via conda
Install conda
wget https://repo.anaconda.com/miniconda/Miniconda3-latest-Linux-x86_64.sh
bash Miniconda3-latest-Linux-x86_64.sh
Follow the prompts. You can accept the defaults. You will need to restart your terminal for the changes to take effect.
Create a conda environment
with a suitable version of python (>=3.10 not working as of Jan 2023):
conda create -n otr python=3.8 pip
conda activate otr
Setup of MySQL & MongoDB
conda install -c conda-forge mysql mercurial
conda install -c anaconda mongodb
Download opentrack source
hg clone https://hg.reportlab.com/hg-otr/raceresults
cd raceresults
Setup of python packages
Now install all python packages with pip
pip install mysqlclient
pip install -r requirements.txt
note, you will have to install libxml2-dev, libxslt-dev, and python-dev for lxml to install correctly. This is most easily done with sudo and a package-manager (e.g. sudo apt-get install libxml2-dev libxslt-dev python-dev), but may also be possible with conda if root access is not available.
Setup of MySQL
choose a directory for the database files and replace "/path/to/sql-data" with it in the commands below
mkdir -p /path/to/sql-data
cd /path/to/sql-data
Make a mysql config file
named, e.g. sql.cnf, with the following in it:
[server]
user=root
basedir=/path/to/anaconda3/envs/otr/bin # your virtualenv path
datadir=/path/to/sql-data/data

[mysqld]
pid-file=/path/to/sql-data/mysqld.pid
socket=/path/to/sql-data/mysqld.sock
port=8901 # or whatever port you want

[client]
socket=/path/to/sql-data/socket
Starting mysql server
you will need to make sure this is running each time you need to access the databases
# get mysql server running
mysqld --defaults-file=path/to/sql-data/sql.cnf

# test we can access it
mysql --host=localhost --socket=/path/to/sql-data/mysqld.sock -u root
Setup and starting of MongoDB
mkdir -p /path/to/mongo-data
mongod --dbpath /path/to/mongo-data/db --logpath /path/to/mongo-data/log/mongod.log --fork
Edit dev server Djanogo DATABASE settings
in raceresults/project/settings.py to use your local mysql server
DATABASES = {
    'default': {
        'ENGINE': 'django.db.backends.mysql',
        'NAME': startup.getDatabaseName('otr'),
        'USER': startup.getDatabaseUser(),
        'PASSWORD': '' # or a password if you set one
        'HOST': '127.0.0.1',
        'PORT': '8901',
    }
Patch docengine
which doesn't currently play nicely with virtual environments outside of the raceresults directory
python -c "import docengine; print(docengine.__file__)" # to find the location of docengine
edit 'startup.py' in docengine/ so that the function findEnvironmentDir() returns
/path/to/raceresults
Edit update-dev-environment script to use local mysql
the function run_copy-sql needs adjusting wherever mysql is called to have the argument:
mysql --socket=/path/to/sql-data/mysqld.sock
Download opentrack databases
this will take several minutes
./update_dev_environment
Test and run
python manage.py collectstatic
python manage.py test project
python manage.py runserver
and visit http://localhost/ in your browser - you should see the opentrack homepage (test version)
Update this document!
If you learned anything new, had to run extra commands, or have tips on versions and distributions to use, please keep detailed notes, and add a section here when done!